PPA-Installation Guide
This is a step-by-step procedure for installing Shutter on Ubuntu, aimed at beginners or users who rarely worked with PPAs (Personal Package Archives) before.
Please note: This guide applies only to Ubuntu.
Ubuntu 9.10 (Karmic) and later
- You can add a PPA to your system with a single line in your terminal. Open a terminal and enter:
- Now, as a one-off, you should tell your system to pull down the latest list of software from each archive it knows about, including the PPA you just added:
- Install Shutter
sudo add-apt-repository ppa:shutter/ppa
sudo apt-get update
sudo apt-get install shutter
On older (pre 9.10) Ubuntu systems
- Add Shutter PPA to your ‘Software Sources’
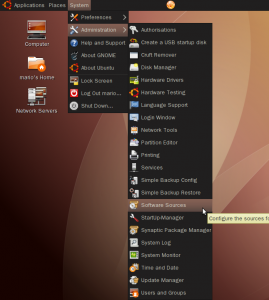
Navigate to System ▸ Administration ▸ Software Sources
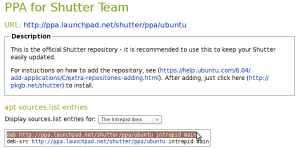
- Visit our PPA (hosted at Launchpad.net – https://launchpad.net/~shutter/+archive/ppa)
Select your Ubuntu release and copy the first line into your clipboard (Ctrl+C) as shown below.
- Each PPA has its own unique key that is used to sign the packages in that archive. To add the PPA’s key to your own system open a terminal and enter :
wget -q https://shutter-project.org/shutter-ppa.key -O- | sudo apt-key add -Hint: Don’t forget the trailing dash. You’ll see a confirming ‘OK’ when the command was successfull.
(Until you add the PPA’s key to your own system, you’ll see warnings that you’re downloading from an untrusted source)
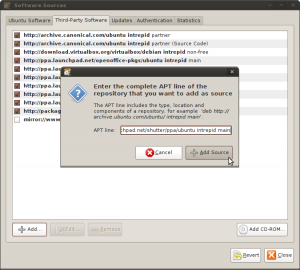
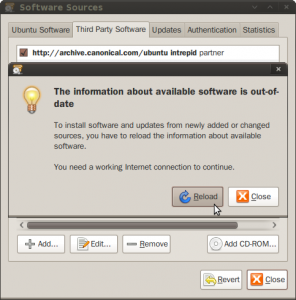
- Return to the ‘Software Sources’ window, navigate to the Third Party Software tab and hit the Add button.

- Paste your clipboard content into the entry box of the following popup to add our repository to the list of software sources. Then click on Add Source.
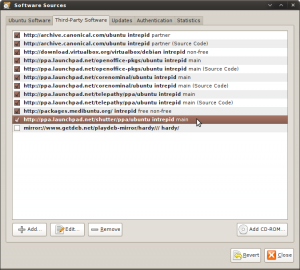
- If everything worked as expected our repository should be activated now. You can now close the window.
- When prompted to ‘Reload the information about available software’ press Reload and wait for the operation to complete.
- Now, just click here to install Shutter (using AptURL)
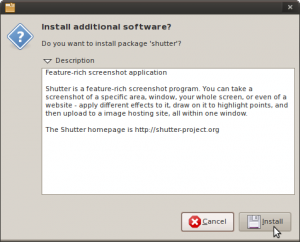
or open a terminal and enter:
sudo apt-get install shutter
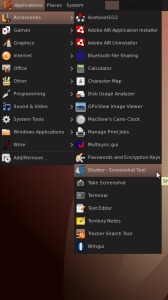
- After the package manager has done its work you will be able to start Shutter for the first time using the menu entry.
50 Comments
Trackbacks/Pingbacks
- Herramientas para mejorar su experiencia en la red - ENTER.CO - [...] Ubuntu (la distribución de GNU/Linux más popular, calificada como ‘el pingüino para presentar en sociedad’) cuenta con una funcionalidad ...
- Shutter, LA capture d'écran sous Linux / #NeoSting - [...] ici, et Vous devriez peut-être utiliser les dépôts de votre système, mais si vous préférez ajouter du PPA, pour ...
- برامج لينكس - [...] [...]
- برامج لينكس - [...] [...]
- Ubuntu [Alt] und [PrtSc] für ein Fensterabbild » Von Roman Hanhart » ubuntublog.ch - [...] wer es etwas komfortabler haben möchte, darf durchaus shutter einsetzen. Mit der aktuellen ppa bekommt man eine sehr moderne ...
- Shutter | Cebuntu - [...] -installation guide here. [...]
- Как я пишу посты в Ubuntu - [...] сайте программы я нашел ряд команд, которые нужно выполнить в терминале Ubuntu [...]
- Shutter « Lega99's Blog - [...] A guide on installing from the PPA is available here. [...]
- Shutter 0.86.3 adds integration with Ubuntu One and new icons | Shutter - Featureful Screenshot Tool - [...] PPA-Installation Guide [...]
- How to reanimate disabled features | Shutter - Featureful Screenshot Tool - [...] PPA-Installation Guide [...]



Thanks SO MUCH!!!!!! This is great. I’ve been a skitch user on the Macs for awhile and now I can use this at home on Ubuntu!! Many thanks!
The dash was already there but it was not visible on some browser zoom levels. Maybe this was the reason.
I’ve selected a smaller font now, so the command fits in the column. Additionally I’ve added an extra hint.
There is something wrong with step three. I was getting errors.
I looked at the links and found a dash missing at the end. The line should look like this.
wget -q /shutter-ppa.key -O- | sudo apt-key add -
@luccek
Please make sure that the unique key of Shutter’s PPA was added correctly to your system (Step 3).
You can check that via System ▸ Administration ▸ Software Sources
http://www.ubuntu-pics.de/bild/18729/bp_008_v8je42.png
Please keep in mind that the key’s description still contains ‘GScrot’ instead of ‘Shutter’.
I followed the procedure :easy and well explained .
Shutter installed allright but there was a problem with
NO_PUBKEY FC6D7D9D009ED615 , I didnt understand . L.
@Homitsu
Sorry for the delay, but your comment was detected as spam and I didn’t notice it. I hope you don’t mind that I’ve copied your content to the Launchpad bug.
I’ll check your files as soon as possible.
@Zeke Krahlin
The instructions are clearly labelled as for Ubuntu, so there is nothing wrong with them.
I use Linux Mint, which does not have the “Software Sources” utility. But I did find a page where the instructions are strictly text commands…and it works fine. And much, much simpler than following the instructions on this page (sorry to say). Here’s that page:
http://www.ubuntugeek.com/shutter-featureful-screenshot-tool.html
Huh… Sorry for this, but I hate Launchpad and its terrible interface; hope you don’t mind if I use comments…
>> content copied to #384546
@Homitsu
I’ve created a bug report for this at launchpad.net, thanks:
https://bugs.launchpad.net/shutter/+bug/384546
As I still can’t reproduce this error it would be nice if you could provide more information. Please comment on this bug and attach the content of your ‘/etc/apt/sources.list’ file and the output of the command ‘sudo apt-key list’. Thanks for your help.